Tips
Files Structure
/ajax(Ajax files)-
/css(Template CSS) /demos(Demos CSSs)/examples(Examples CSSs)/fonts(Font Faces, Font Awesome, etc..)-
/skinsdefault.css...(Create your own skin)
/img(All Images)-
/js(Template JS) /demos(JS files with scripts related to demos)/examples(Examples JS. I.E: animations, forms, etc...)/views(JS to run in specific pages. I.E: Home or Contact Us)/master(You don't need to include that folder in your project, it has only the Style Switcher functions, source files from LESS and SASS)/php(PHP Helpers - I.E: Contact Us form, mailchimp and instagram integration.)/vendor(All external libs. We keep all of them in this folder to make updates easily.)/video(All Videos)
Javascript
It's possible to change the JS settings by extending the defaults from the template, that way is so much easier to update the theme changing only one JS file.
Here are a few samples on how to do that:
Changing Settings
1) Changing the "scroll to top" icon: (js/custom.js)
$.extend(theme.PluginScrollToTop.defaults, {
	iconClass: 'fa fa-chevron-up'
});
2) Changing the "word rotate" default delay: (js/custom.js)
$.extend(theme.PluginWordRotate.defaults, {
	delay: 3000
});
You can find all the defaults of the plugins and partials in the file js/theme.js as you can see here:
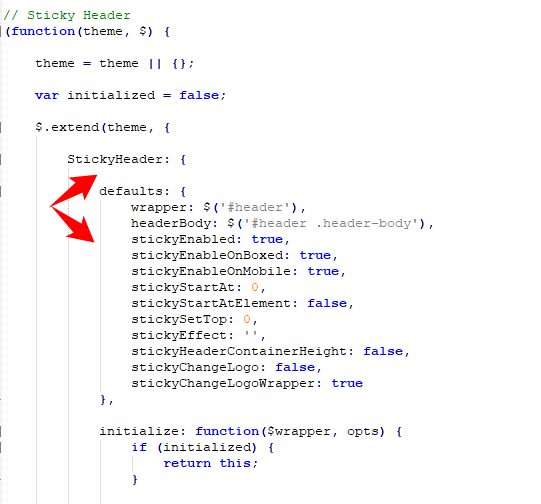
Changing Plugins Options
The template includes a very simple way to configure the elements that are initialized automatically, such as the sliders, you just need to put the settings in the "data-plugin-options" attribute, as you can see below:
<div id="revolutionSlider" class="slider rev_slider" data-version="5.4.8" data-plugin-revolution-slider data-plugin-options="{'delay': 9000, 'gridwidth': 1170, 'gridheight': 670}">
It works the same way for most of the plugins included in the template: owlCarousel, Word Rotate, Twitter Feed, etc...
If you want to disable the auto initialization you can just add a class "manual" or remove the data-plugin-* attribute:
<div id="revolutionSlider" class="slider rev_slider manual" data-version="5.4.8">
So now you can initialize that using the standard JS mode:
$(document).ready(function() {
	$('#revolutionSlider').revolution({
		delay:9000,
		gridwidth:1170,
		gridheight:670
		...
		...
	});
});
Remove/Disable a Plugin or Partial
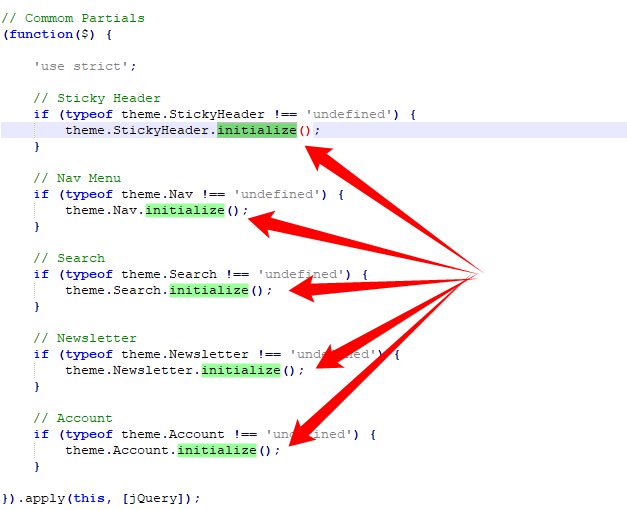
If you want to remove/disable a plugin or partial that has a "initialize" function completely, follow this example: (js/custom.js)
theme.PluginScrollToTop.initialize = function() {};
You can find all the available plugins and partials in the file js/theme.init.js as you can see here:
HTML Structure
The template is based on Bootstrap 5 Framework - https://getbootstrap.com/docs/
Bootstrap includes a responsive, mobile first fluid grid system that appropriately scales up to 12 columns as the device or viewport size increases.
<div class="row">
	<div class="col-md-12">
		Level 1 column
		<div class="row">
			<div class="col-md-6">Level 2</div>
			<div class="col-md-6">Level 2</div>
		</div>
	</div>
</div>
Grid Layout with 5 columns (custom made - not Bootstrap)
If you want a grid layout with 5 columns:<div class="row"> <div class="col-md-1-5"> Column 1 </div> <div class="col-md-1-5"> Column 2 </div> <div class="col-md-1-5"> Column 3 </div> <div class="col-md-1-5"> Column 4 </div> <div class="col-md-1-5"> Column 5 </div> </div>
CSS Structure
The organization of the CSS is one of our priorities.
These are the CSS file we're using in the template:
theme.css- (The basic layout structure styles)theme-elements.css- (Elements such as sliders, boxes, titles, etc...)theme-shop.css- (Shop Pages styles)theme-blog.css(Blog Pages styles)-
/demos(Demos CSSs)/examples(Examples CSSs)/fonts(Font Faces, Font Awesome, etc..)-
/skinsdefault.css...(Create your own skin)
custom.css(Add all customizations into this file)
CSS Helper Classes
Bootstrap Helpers
Bootstrap 5 comes with various utilities/helper classes.
https://getbootstrap.com/docs/
Text Helpers
| Class | Description |
|---|---|
|
From: .text-1 Until: .text-15 |
Changes text font size in all resolutions |
|
From: .text-sm-1 Until: .text-sm-15 |
Changes text font size from small resolution |
|
From: .text-md-1 Until: .text-md-15 |
Changes text font size from medium resolution |
|
From: .text-lg-1 Until: .text-lg-15 |
Changes text font size from large resolution |
|
From: .text-xl-1 Until: .text-xl-15 |
Changes text font size from extra large resolution |
|
From: .line-height-1 Until: .line-height-9 |
Changes text line height in all resolutions |
|
From: .line-height-sm-1 Until: .line-height-sm-9 |
Changes text line height from small resolution |
|
From: .line-height-md-1 Until: .line-height-md-9 |
Changes text line height from medium resolution |
|
From: .line-height-lg-1 Until: .line-height-lg-9 |
Changes text line height from large resolution |
|
From: .line-height-xl-1 Until: .line-height-xl-9 |
Changes text line height from extra large resolution |
| .line-height-initial | Changes text line height in all resolutions |
| .line-height-sm-initial | Changes text line height from small resolution |
| .line-height-md-initial | Changes text line height from medium resolution |
| .line-height-lg-initial | Changes text line height from large resolution |
| .line-height-xl-initial | Changes text line height from extra large resolution |
| .text-uppercase | Uppercase text |
| .text-lowercase | Lowercase text |
| .text-capitalize | Capitalize text |
| .text-transfrom-none | None text transform |
| .text-decoration-none | None text decoration |
| .text-muted | Muted text |
| .font-weight-light | Changes text font weight |
| .font-weight-normal | Changes text font weight |
| .font-weight-semibold | Changes text font weight |
| .font-weight-bold | Changes text font weight |
| .font-weight-extra-bold | Changes text font weight |
| .ls-0 | Changes text letter spacing |
| .negative-ls-1 | Changes text letter spacing |
| .negative-ls-2 | Changes text letter spacing |
| .negative-ls-3 | Changes text letter spacing |
| .positive-ls-1 | Changes text letter spacing |
| .positive-ls-2 | Changes text letter spacing |
| .positive-ls-3 | Changes text letter spacing |
| .text-color-primary | Changes text color to the primary color |
| .text-color-secondary | Changes text color to the secondary color |
| .text-color-tertiary | Changes text color to the tertiary color |
| .text-color-quaternary | Changes text color to the quaternary color |
| .text-color-dark | Changes text color to the dark color |
| .text-color-light | Changes text color to the light color |
Others
| Class | Description |
|---|---|
| .opacity-0 | Changes element opacity |
| .opacity-1 | Changes element opacity |
| .opacity-2 | Changes element opacity |
| .opacity-3 | Changes element opacity |
| .opacity-4 | Changes element opacity |
| .opacity-5 | Changes element opacity |
| .opacity-6 | Changes element opacity |
| .opacity-7 | Changes element opacity |
| .opacity-8 | Changes element opacity |
| .opacity-9 | Changes element opacity |
| .opacity-10 | Changes element opacity |
| .scale-1 | Changes element transform scale |
| .scale-2 | Changes element transform scale |
| .scale-3 | Changes element transform scale |
| .scale-4 | Changes element transform scale |
| .scale-5 | Changes element transform scale |
| .scale-6 | Changes element transform scale |
| .top-auto | Changes element top position |
| .bottom-auto | Changes element bottom position |
|
From: .top-0 Until: .top-10 |
Changes element top position |
|
From: .bottom-0 Until: .bottom-10 |
Changes element bottom position |
|
From: .left-0 Until: .left-10 |
Changes element left position |
|
From: .right-0 Until: .right-10 |
Changes element right position |
| .p-relative | Changes position to relative |
| .p-absolute | Changes position to absolute |
| .p-fixed | Changes position to fixed |
| .p-static | Changes position to static |
| .box-shadow-none | Remove box shadow |
| .cur-pointer | Changes cursor to pointer |
| .outline-none | Changes outline to none |
| .overflow-hidden | Changes overflow to hidden |
| .overflow-visible | Changes overflow to visible |
| .z-index-0 | Changes element z-index |
| .z-index-1 | Changes element z-index |
| .z-index-2 | Changes element z-index |
| .z-index-3 | Changes element z-index |
| .no-borders | Remove element borders |
| .rounded | Changes border radius |
| .b-thin | Changes border width |
| .b-normal | Changes border width |
| .b-thick | Changes border width |
| .ws-nowrap | Changes white space |
| .ws-normal | Changes white space |
| .ws-auto-mobile | Changes width to auto on mobile devices |
| .w-100-mobile | Changes width to 100% on mobile devices |
| .overlay | Adds an overlay effect when mouse hover |
| .overlay .overlay-show | Adds an overlay effect always visible |
| .overlay .overlay-show .overlay-op-5 | Adds an overlay effect always visible with opacity level 0.5 (possible values for opacity is from "-op-1" until "-op-9") |
You can find all available helpers classes on css/theme.js ( search for /* Helpers */ )
Customization & Styles
Colors
The style switcher was made to support unlimited skin colors, for that we use Less (http://www.lesscss.org/) to process the CSS dinamically in the demo and show the color right away.
You don't need to use LESS in your project, after you done customizing your skin you may want to grab the generated code and save it in a file in the folder: /css/skins/(skin-name).css
Learn More: How to change the Skin
Layout Style (Normal/Boxed)
The template has two different layout modes, Wide and Boxed. The wide one is the default option, if you want to use the Boxed version, add the following class in the <html>:
<html class="boxed">
You can also customize the background color or image.
Background Color (Light/Dark)
The template has two different background colors, Light and Dark. The light one is the default option, if you want to use the Dark version, add the following class in the <html>:
<html class="dark">
Fonts
To change the embedded font, please take a look in the head part of the website and you will find this tag:
<link href="http://fonts.googleapis.com/css?family=Open+Sans:300,400,600,700,800|Shadows+Into+Light" rel="stylesheet" type="text/css">To change the font, first go to http://www.google.com/webfonts choose a font and use the generated code.
Skin
You can generate your own skin color: 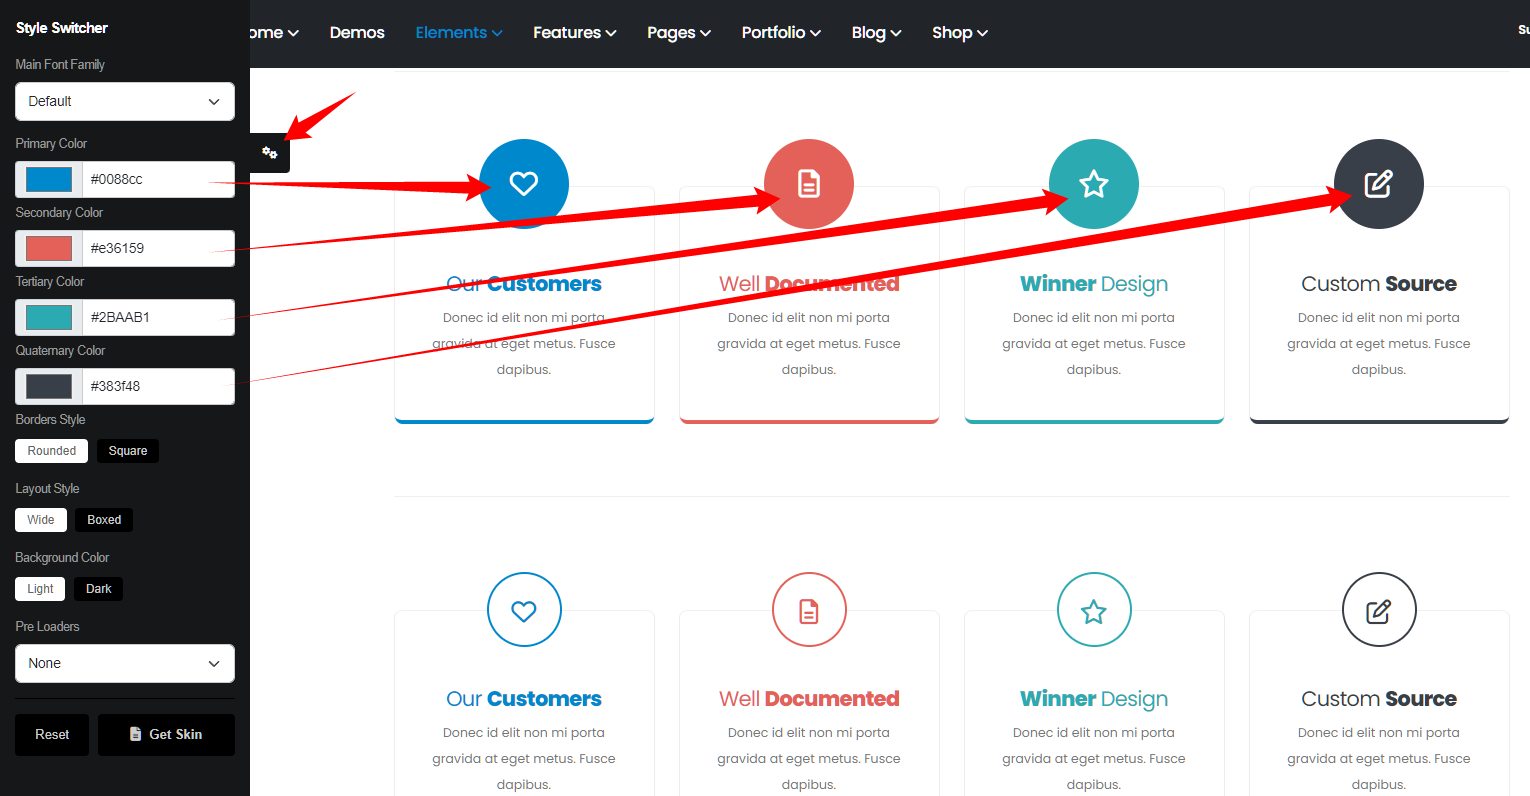

Copy that and save as a css skin file (css/skins/default.css).
Warning 1: If you are using a niche demo as start (Construction, Medical, Law Firm, Archirecture, etc), instead of (css/skins/default.css) you should change the CSS code in the respective niche demo skin CSS file, eg: Construction (css/skins/skin-construction.css), Medical (css/skins/skin-medical.css), etc...
Warning 2: Make sure you generate the skin with the correct version, using the preview URL:
- https://www.okler.net/previews/porto/9.9.1/
- https://www.okler.net/previews/porto/9.9.0/
...
Related Posts - How to use the Boxed Version - How to use the Dark Version
RTL
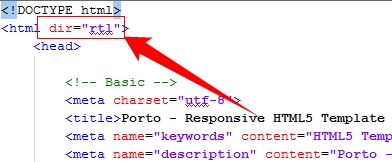
To activate the RTL mode please follow the steps:
1) Add the "dir" attribute in the HTML tag:
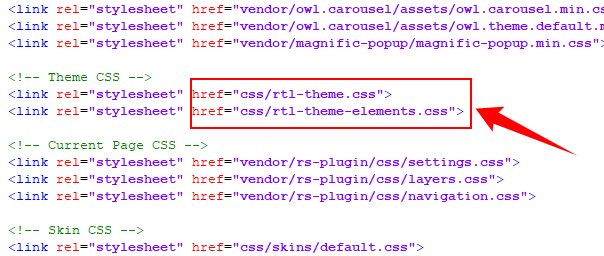
2) Copy all the files from the folder:
HTML/master/rtl/css to the default css folder HTML/css.3) Add the "rtl-" prefix in the files:
Icons
Font Awesome is a @font-face iconset that you can change size and color of the icons using CSS.
If you need more information, please visit this site: http://fontawesome.io/
<i class="fa fa-edit"></i>
<i class="fa fa-search"></i>
...
Simple Line Icons is a @font-face iconset that you can change size and color of the icons using CSS.
If you need more information, please visit this site: https://github.com/thesabbir/simple-line-icons
<i class="icons icon-user"></i>
<i class="icons icon-people"></i>
...
Lightbox
The lightbox is driven by Magnific Popup script.
Here's an example of usage:
<a class="img-thumbnail lightbox" title="Open Lightbox" href="img/projects/project-4.jpg" data-plugin-options="{'type':'image'}">
	<img class="img-responsive" src="img/projects/project-4.jpg">
</a>
For more information check the documentation.
Video Background
The video background are driven by the Vide Plugin - https://github.com/VodkaBears/Vide
Here's an example of usage:
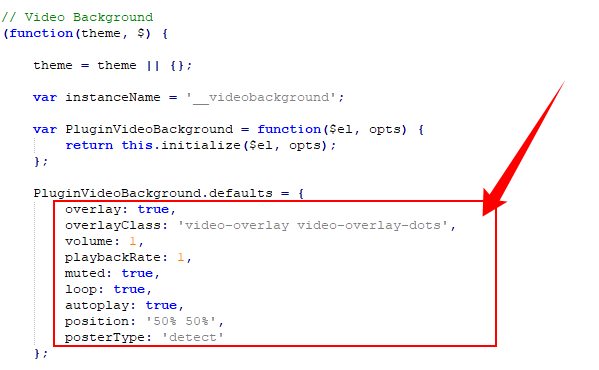
<section class="video section section-video" data-video-path="video/memory-of-a-woman" data-plugin-video-background data-plugin-options="{'posterType': 'jpg', 'position': '50% 50%', 'overlay': true}">
Prepare your video in several formats like '.webm', '.mp4' for cross browser compatability, also add a poster with .jpg, .png or .gif extension and set in the attribute data-video-path.
Here's all possible options you can define trough data-plugin-options="{....}":
Instagram Feed
Important:
Since 2020, the Instagram have made important changes in your API regarding Access Token. Now the access token has a limited life time (60 days). This mean we need refresh the access token from time to time. The only secure way to do that is trough a PHP script in your own server. So since Porto 8.4.0, a server running PHP is required to get the Instafram Feed working.
Important:
The Instagram Feed works only in a online web server. So please only do the steps below when you have your website live in a stage or production environment.
1) Create a Facebook app linked to Instagram, and add yourself as a test user. For it follow steps 1 - 3 on this link: Facebook Basic Display API guide
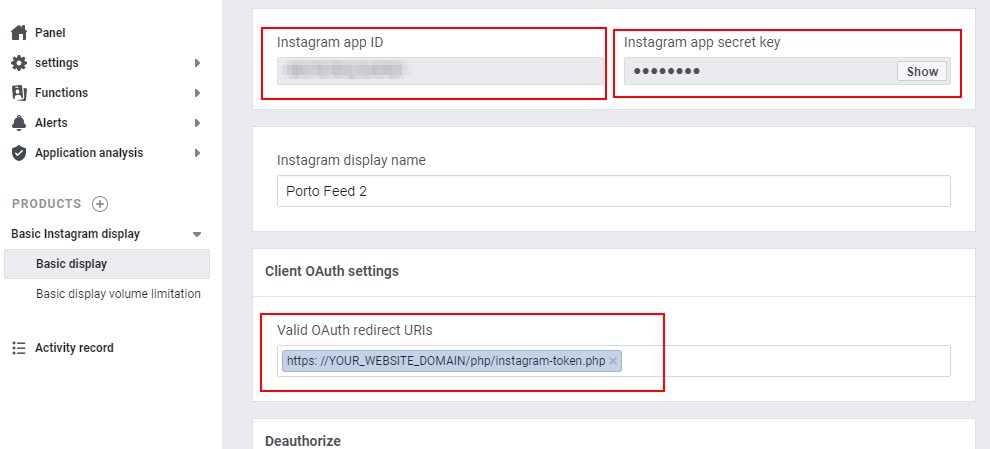
2) In the Facebook app settings, go to Basic Instagram Display > Basic Display and fill the field "Valid OAuth redirect URIs" with https://www.yourdomain.com/php/instagram-token.php
Important: HTTPS is required.
Important: Change "www.yourdomain.com" with your website domain.

3) Open the PHP file php/instagram-token.php and change the APP ID, APP SECRET and REDIRECT URL with your Basic Instagram Display App Info:
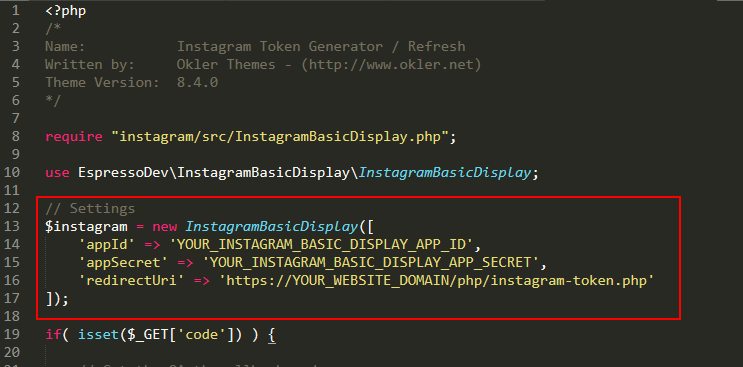
* Do not forget to change "YOUR_WEBSITE_DOMAIN" with your website domain (HTTPS is required).
4) Once you have the project running trough a online server, access the URL below in the browser:
https://www.yourdomain.com/php/instagram-token.php
A link "Login with Instagram" will appear. Click in that link to login with your Instagram account and allow the App to get information. A new page should appear with the token code. This mean the token were created with success.
5) Make sure you have required scripts below included on footer of page:
<script src="vendor/instafeed/instafeed.min.js"></script>
<script src="js/examples/examples.instagramFeed.js"></script>
6) Use one of the HTML examples below. Porto has 3 types of Instagram Feed:
Basic:<div class="instagram-feed" data-type="basic"></div>Carousel:
<div class="instagram-feed" data-type="carousel"></div>No Margins:
<div class="instagram-feed" data-type="nomargins"></div>
Important: The "carousel" type needs Owl Carousel plugin included on the page:
Head:
<link rel="stylesheet" href="vendor/owl.carousel/assets/owl.carousel.min.css">
<link rel="stylesheet" href="vendor/owl.carousel/assets/owl.theme.default.min.css">

Footer:
<script src="vendor/owl.carousel/owl.carousel.min.js"></script>
At this point the Instagram Feed should be working in the front end. But as mentioned before, the token is valid for 60 days. This mean the Instagram Feed will stop works if we don't refresh the token. To maintain the token refreshed we need setup a CRON JOB in the server to run the "refresh" script from time to time. For it please follow the steps below:
Important:
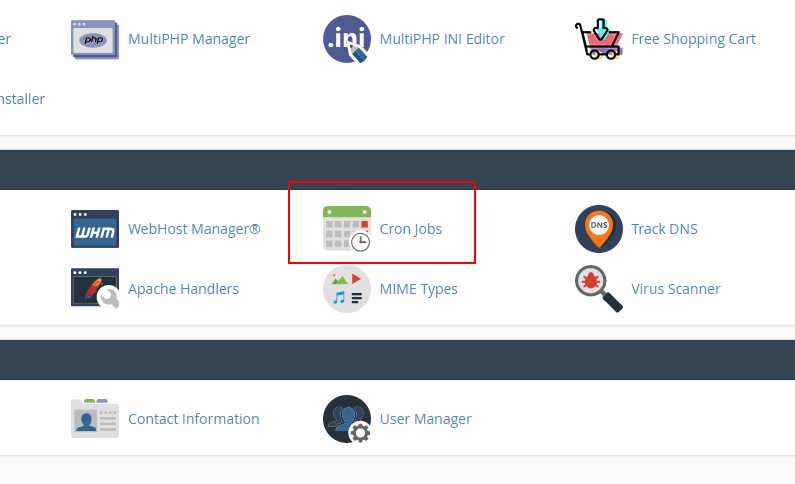
The way for setup CRON JOBS in the server can change from server to server. In this tutorial we are using an A2HOSTING server with CPANEL.
1) First login to your hosting CPANEL and look for Cron Jobs:
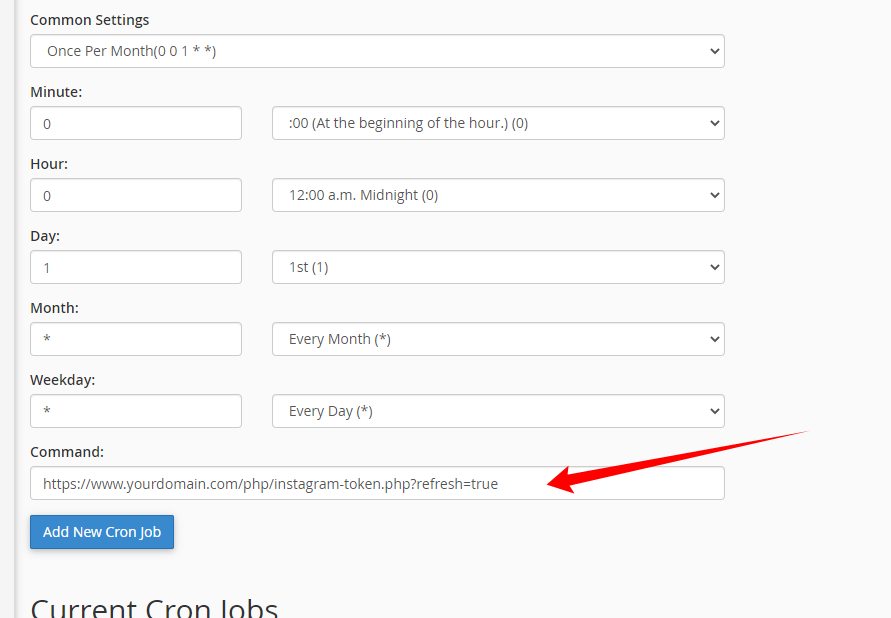
2) Setup a cron job to run once per month with the command https://www.yourdomain.com/php/instagram-token.php?refresh=true:
Google Maps
Usage of the Google Maps APIs requires a key. If you are using the Google Maps API it will require a key going forward.
1) Get an API key: https://developers.google.com/maps/documentation/javascript/get-api-key
2) Add the API key in the HTML (Script)
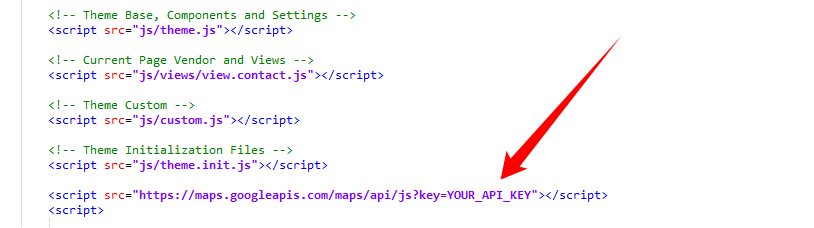
<script src="https://maps.googleapis.com/maps/api/js?key=YOUR_API_KEY"></script>
3) Configure the map location. For example, using as base the file contact-us.html:
METHOD 1:
Open the file using a text editor and go to the bottom of document. You will see the javascript code below:
Change the address in the mapMarkers array.
METHOD 2:
If you want to set the locations using Latitude and Longitude:
Replace the JS script in the HTML to this one:
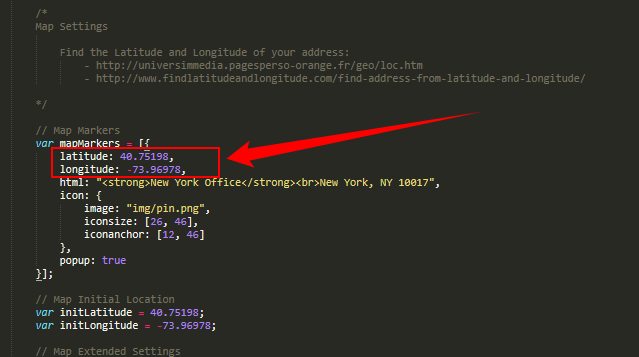
Here’s a good website to find the coordinates of your address: https://www.latlong.net/
Contact Form
1) HTML:
<form id="contactForm" class="contact-form appear-animation" action="php/contact-form.php" method="POST" data-appear-animation="fadeIn" data-appear-animation-delay="600">
	<div class="contact-form-success alert alert-success d-none mt-4" id="contactSuccess">
		<strong>Success!</strong> Your message has been sent to us.
	</div>

	<div class="contact-form-error alert alert-danger d-none mt-4" id="contactError">
		<strong>Error!</strong> There was an error sending your message.
		<span class="mail-error-message text-1 d-block" id="mailErrorMessage"></span>
	</div>

	<div class="form-row">
		<div class="form-group col-lg-6">
			<label class="required font-weight-bold text-dark">Full Name</label>
			<input type="text" value="" data-msg-required="Please enter your name." maxlength="100" class="form-control" name="name" id="name" required>
		</div>
		<div class="form-group col-lg-6">
			<label class="required font-weight-bold text-dark">Email Address</label>
			<input type="email" value="" data-msg-required="Please enter your email address." data-msg-email="Please enter a valid email address." maxlength="100" class="form-control" name="email" id="email" required>
		</div>
	</div>
	<div class="form-row">
		<div class="form-group col">
			<label class="font-weight-bold text-dark">Subject</label>
			<input type="text" value="" data-msg-required="Please enter the subject." maxlength="100" class="form-control" name="subject" id="subject" required>
		</div>
	</div>
	<div class="form-row">
		<div class="form-group col">
			<label class="required font-weight-bold text-dark">Message</label>
			<textarea maxlength="5000" data-msg-required="Please enter your message." rows="8" class="form-control" name="message" id="message" required></textarea>
		</div>
	</div>
	<div class="form-row">
		<div class="form-group col">
			<input type="submit" value="Send Message" class="btn btn-primary btn-modern" data-loading-text="Loading...">
		</div>
	</div>
</form>
2) Make sure that you have the jQuery Validate plugin included on document:
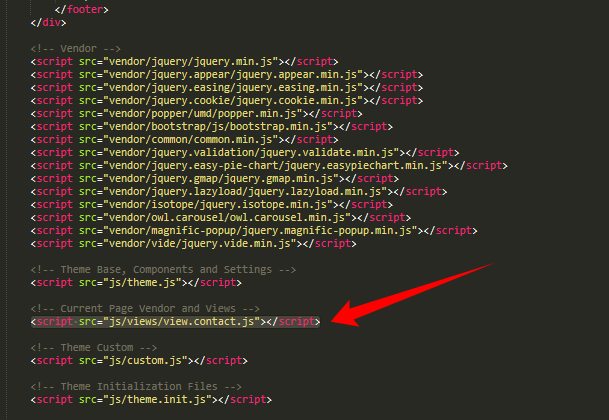
3) Add the script "view.contact.js" on footer of document. Like the image below:
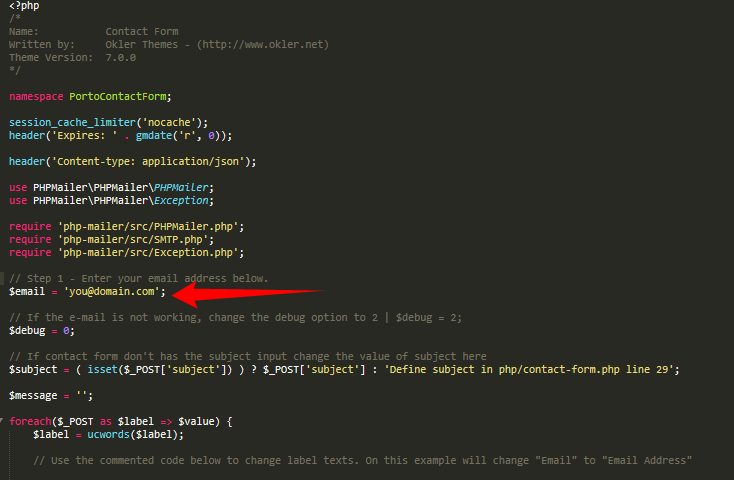
4) In php/contact-form.php change the value of variable $email to your email (the email that will receive contacts)
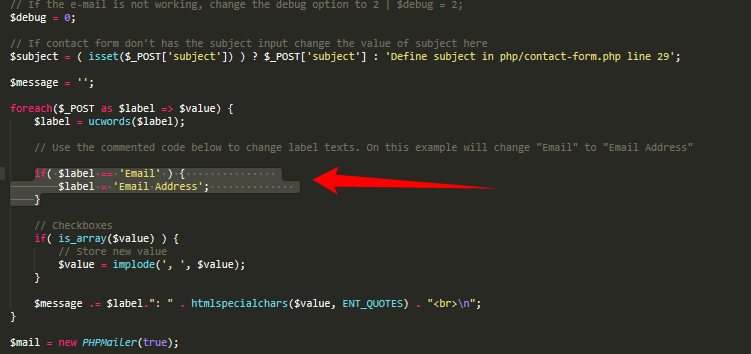
4.1) OPTIONAL: You can easily change the label text of each field. For example, to change "Email" for "Email Address" just uncomment the code like on image below:
Contact form is not working ?
Try the solution on this link: http://www.okler.net/forums/topic/important-contact-form-is-not-working/
Contact Form receiving blank emails / {"response":"success"}
Make sure that you made the step 3 of tutorial above.
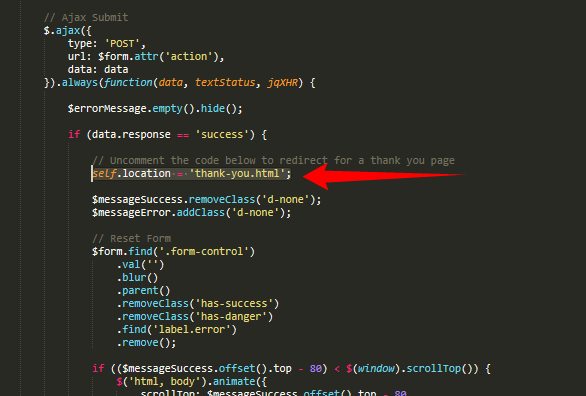
Contact Form - Thank you page
To redirect for a "Thank You" page when contact form is sent, just uncomment the code below at js/views/view.contact.js:
Google Recaptcha v2
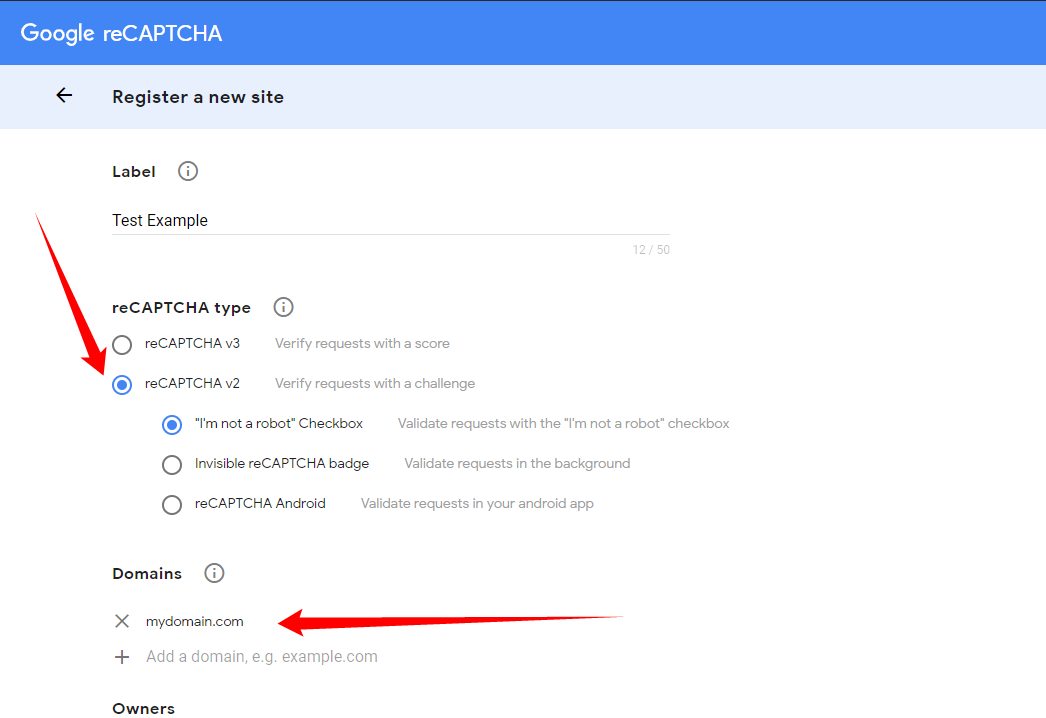
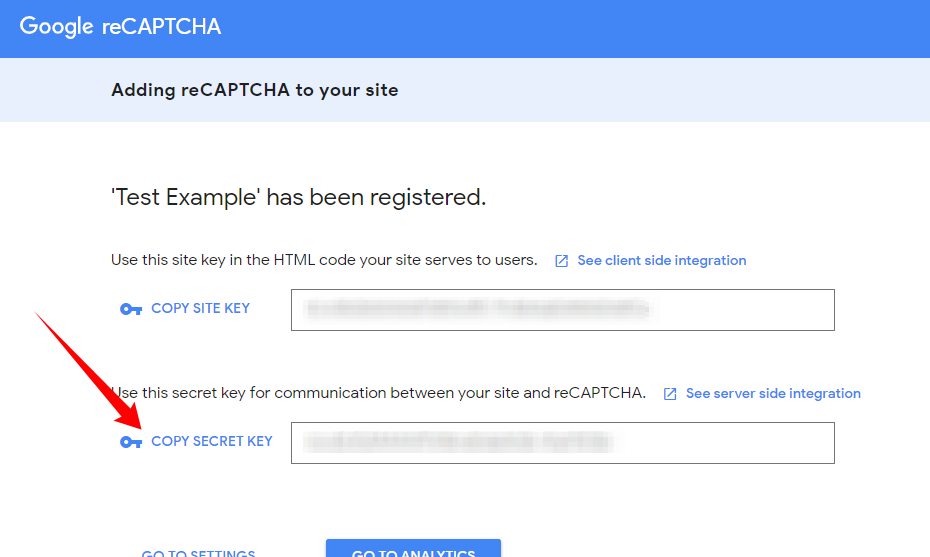
1) For adding reCAPTCHA v2 to your site, you need to register your site and get reCAPTCHA v2 API keys.
Register your site at Google from here – https://www.google.com/recaptcha/admin
2) Get your Site Key.
Site key is used to display the reCAPTCHA widget.
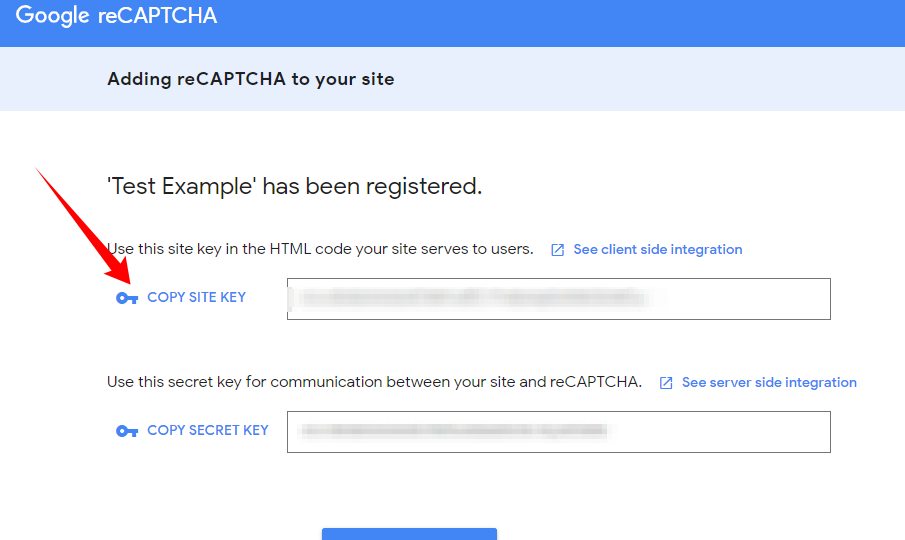
3) Get your Secret Key.
Secret key helps authorizes communication between your site and the reCAPTCHA server.
4) HTML:
Change "YOUR_RECAPTCHA_SITE_KEY" by your generated Google Recaptcha site key.
<form id="contactForm" class="contact-form" action="php/contact-form-recaptcha-v2.php" method="POST">
	<div class="contact-form-success alert alert-success d-none mt-4" id="contactSuccess">
		<strong>Success!</strong> Your message has been sent to us.
	</div>

	<div class="contact-form-error alert alert-danger d-none mt-4" id="contactError">
		<strong>Error!</strong> There was an error sending your message.
		<span class="mail-error-message text-1 d-block" id="mailErrorMessage"></span>
	</div>

	<div class="form-row">
		<div class="form-group col-lg-6">
			<label class="required font-weight-bold text-dark">Full Name</label>
			<input type="text" value="" data-msg-required="Please enter your name." maxlength="100" class="form-control" name="name" id="name" required>
		</div>
		<div class="form-group col-lg-6">
			<label class="required font-weight-bold text-dark">Email Address</label>
			<input type="email" value="" data-msg-required="Please enter your email address." data-msg-email="Please enter a valid email address." maxlength="100" class="form-control" name="email" id="email" required>
		</div>
	</div>
	<div class="form-row">
		<div class="form-group col">
			<label class="font-weight-bold text-dark">Subject</label>
			<input type="text" value="" data-msg-required="Please enter the subject." maxlength="100" class="form-control" name="subject" id="subject" required>
		</div>
	</div>
	<div class="form-row">
		<div class="form-group col">
			<label class="required font-weight-bold text-dark">Message</label>
			<textarea maxlength="5000" data-msg-required="Please enter your message." rows="5" class="form-control" name="message" id="message" required></textarea>
		</div>
	</div>
	<div class="form-row">
		<div class="form-group col">
			<div class="g-recaptcha" data-sitekey="YOUR_RECAPTCHA_SITE_KEY"></div>
		</div>
	</div>
	<div class="form-row">
		<div class="form-group col">
			<input type="submit" value="Send Message" class="btn btn-primary btn-modern" data-loading-text="Loading...">
		</div>
	</div>
</form>
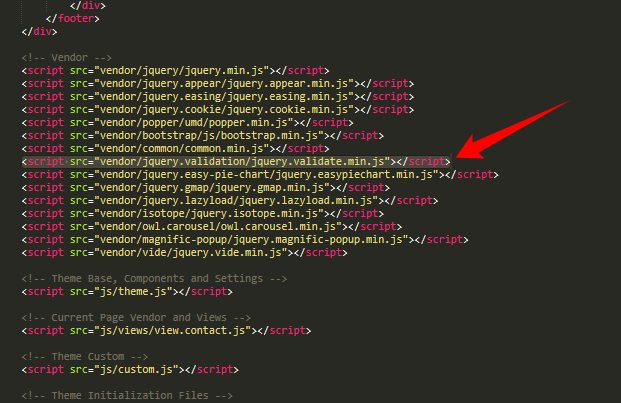
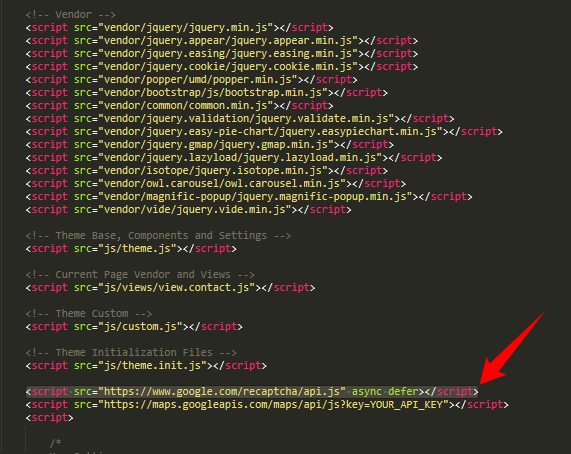
5) Make sure that you have the jQuery Validate plugin included on document:
6) Add the script "view.contact.js" on footer of document. Like the image below:
7) Add the script of Google Recaptcha on footer of document. Like the image below:
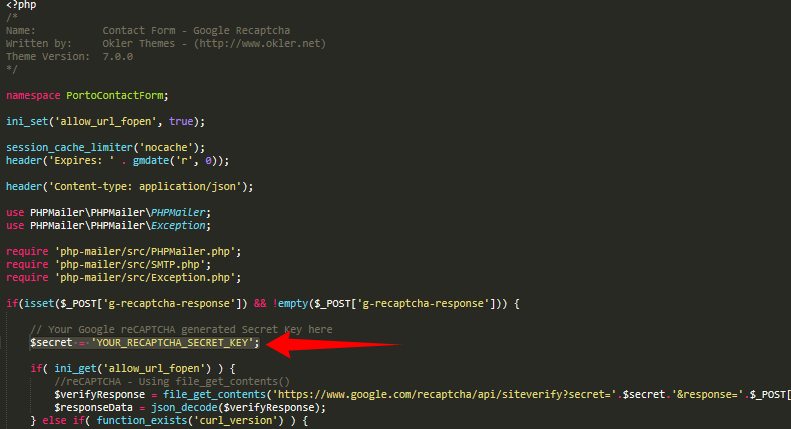
8) In php/contact-form-recaptcha-v2.php change the value of variable $secret to your generated Google Recaptcha Secret Key
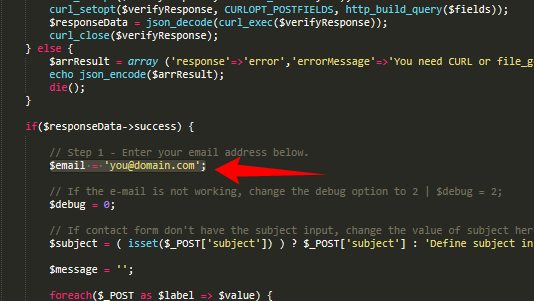
9) In php/contact-form-recaptcha-v2.php change the value of variable $email to your email (the email that will receive contacts)
Google Recaptcha v3
1) For adding reCAPTCHA v3 to your site, you need to register your site and get reCAPTCHA v3 API keys.
Register your site at Google from here – https://www.google.com/recaptcha/admin
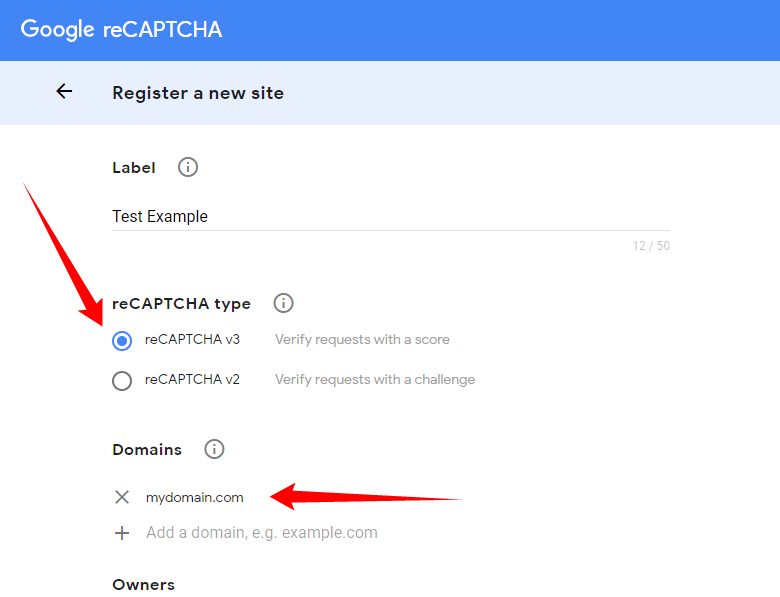
2) Get your Site Key.
Site key is used to display the reCAPTCHA widget.
3) Get your Secret Key.
Secret key helps authorizes communication between your site and the reCAPTCHA server.
4) HTML:
<form id="contactForm" class="contact-form-recaptcha-v3" action="php/contact-form-recaptcha-v3.php" method="POST">
	<div class="contact-form-success alert alert-success d-none mt-4" id="contactSuccess">
		<strong>Success!</strong> Your message has been sent to us.
	</div>

	<div class="contact-form-error alert alert-danger d-none mt-4" id="contactError">
		<strong>Error!</strong> There was an error sending your message.
		<span class="mail-error-message text-1 d-block" id="mailErrorMessage"></span>
	</div>

	<div class="form-row">
		<div class="form-group col-lg-6">
			<label class="required font-weight-bold text-dark">Full Name</label>
			<input type="text" value="" data-msg-required="Please enter your name." maxlength="100" class="form-control" name="name" id="name" required>
		</div>
		<div class="form-group col-lg-6">
			<label class="required font-weight-bold text-dark">Email Address</label>
			<input type="email" value="" data-msg-required="Please enter your email address." data-msg-email="Please enter a valid email address." maxlength="100" class="form-control" name="email" id="email" required>
		</div>
	</div>
	<div class="form-row">
		<div class="form-group col">
			<label class="font-weight-bold text-dark">Subject</label>
			<input type="text" value="" data-msg-required="Please enter the subject." maxlength="100" class="form-control" name="subject" id="subject" required>
		</div>
	</div>
	<div class="form-row">
		<div class="form-group col">
			<label class="required font-weight-bold text-dark">Message</label>
			<textarea maxlength="5000" data-msg-required="Please enter your message." rows="5" class="form-control" name="message" id="message" required></textarea>
		</div>
	</div>
	<div class="form-row">
		<div class="form-group col">
			<input type="submit" value="Send Message" class="btn btn-primary btn-modern" data-loading-text="Loading...">
		</div>
	</div>
</form>
5) Make sure that you have the jQuery Validate plugin included on document:
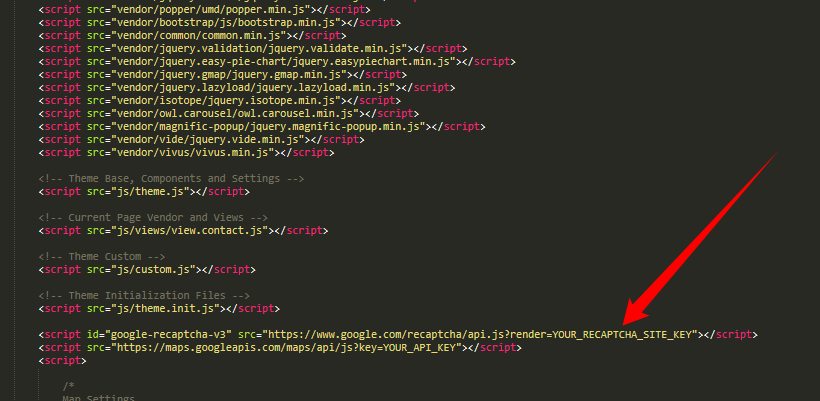
6) Add the script "view.contact.js" on footer of document. Like the image below:
7) Add the script of Google Recaptcha v3 on footer of document and replace "YOUR RECAPTCHA_SITE_KEY" with your recaptcha site key. Like the image below:
8) In php/contact-form-recaptcha-v3.php change the value of variable $secret to your generated Google Recaptcha Secret Key
9) In php/contact-form-recaptcha-v3.php change the value of variable $email to your email (the email that will receive contacts)
Revolution Slider - Add-Ons
Porto comes with Revolution Slider Add-Ons that gives the possibility to create new incredible effects. Here is the official documentation of Revolution Slider explaining how to use:
https://www.themepunch.com/revsliderjquery-doc/whiteboard/
The Revolution Slider Add-Ons scripts are located at: vendor/rs-plugin/revolution-addons
Note that each Add-On needs to be implemented in a different way.
Facebook Comments
To see the facebook comments working first make sure to run the project with a local or online server like APACHE
You can find a working example of facebook comments on the page: blog-post-comments-facebook.html. Note that comes by default showing the facebook page comments.
To set for your page comments just change the data-href="https://developers.facebook.com/docs/plugins/comments" value to your page link, for example:
data-href="https://www.mydomain.com/example-page/index.html"
You can increase or decrease the number of comments to show changing the attribute data-numposts="7"
By default the language defined is English (en_US). To change the language just modify the language code on the facebook script at top of page (after the <body> tag).
For example to change for Spanish language:

If you want the facebook comments in another page just make sure to copy the javascript code on image above and paste after the <body> tag. Then add the HTML code below where you want on the page:
<h4 class="mb-3">Comments (<fb:comments-count href="https://developers.facebook.com/docs/plugins/comments"></fb:comments-count>)</h4>
<div class="fb-comments w-100" data-href="https://developers.facebook.com/docs/plugins/comments" data-numposts="7" data-width="100%"></div>
Disqus Comments
1) First create a new account and forum in https://disqus.com/
2) Add the disqus scripts on footer of page before the </body> tag:
		.
		..
		...
		....
		<!-- Disqus Scripts -->
		<script>
			var disqus_subdomain = 'YOUR_DISQUS_FORUM_SHORTNAME';

			(function() { // DON'T EDIT BELOW THIS LINE
			var d = document, s = d.createElement('script');
			s.src = 'https://'+ disqus_subdomain +'.disqus.com/embed.js';
			s.setAttribute('data-timestamp', +new Date());
			(d.head || d.body).appendChild(s);
			})();
		</script>
		<script id="dsq-count-scr" src="//YOUR_DISQUS_FORUM_SHORTNAME.disqus.com/count.js" async></script>

	</body>
</html>
* Change YOUR_DISQUS_FORUM_SHORTNAME to your disqus short name. For example: okler (from okler.disqus.com)
3) Add the HTML code to show the disqus comments where you want:
<div id="disqus_thread"></div>
Effects
You can add some Animations / Transitions to the elements which fires when an element scrolls into view, it's pretty simple to use and you can add it in any element.
Usage:
<div class="appear-animation" data-appear-animation="bounceIn" data-appear-animation-delay="200">
...
</div>
Heads up: The Attribute data-appear-animation-delay is Optional and is set in Miliseconds.
The animation can be set to all possible options of Animate.css:
https://daneden.github.io/animate.css/